
 11
11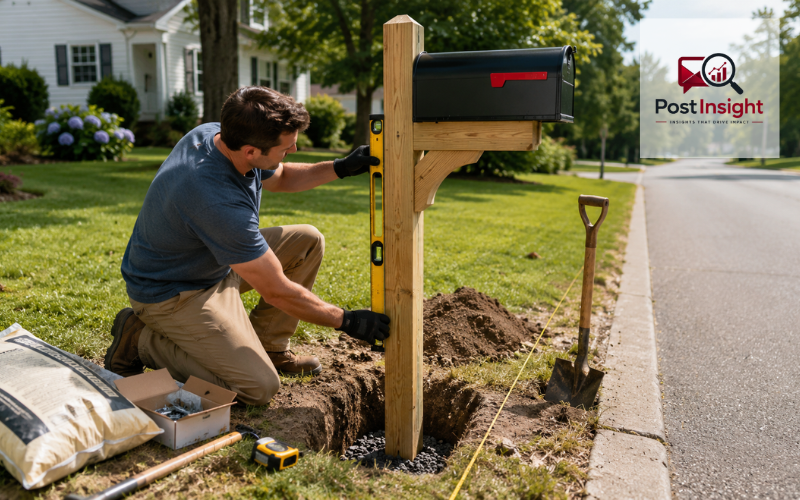
Learning how to install a mailbox may seem straightforward, but a successful installation involves more than digging a hole and attaching a box to a post. The mailbox must be placed at the correct height and distance from the road, supported by a stable post, and positioned where the mail carrier can reach it safely.
The exact process depends on your situation. A completely new curbside installation requires choosing a location, digging a post hole, securing the post, and mounting the mailbox. Replacing an old mailbox may only involve removing the damaged box and installing a new one on the existing support. If the post is still in good condition, you may be able to reuse it with a compatible mounting bracket or wooden board.
Correct placement is important because curbside mailboxes are normally served by a carrier from inside a vehicle. A box that is too high, too low, too close to the road, or blocked by landscaping may be difficult or unsafe to reach. A weak or leaning post can also damage the mailbox and expose passing vehicles to unnecessary risk.
This guide explains the complete residential mailbox installation process, including concrete and concrete-free post methods, mounting a mailbox on a wooden post, reusing an existing post, and installing a wall-mounted mailbox.
| Step | What to Do | Important Detail |
| 1. Confirm placement | Contact the local Post Office and check property rules | Confirm the approved delivery location before digging |
| 2. Measure the location | Mark the mailbox height and distance from the curb | Keep it 41–45 inches high and generally 6–8 inches from the curb |
| 3. Dig the hole | Use a post-hole digger to make a narrow hole | Avoid digging deeper than approximately 24 inches |
| 4. Set the post | Use concrete or firmly compacted gravel | Keep checking that the post is straight and stable |
| 5. Mount the mailbox | Attach a compatible board or mounting bracket | Make sure the door and carrier flag move freely |
| 6. Complete the setup | Add visible address numbers and inspect the installation | Check the height, setback, hardware, and post stability again |
Before buying materials or digging a hole, contact your local Post Office and confirm where the mailbox should be placed. This is especially important when establishing mail delivery at a new address, relocating an existing mailbox, or changing from curbside delivery to another type of delivery.
USPS generally requires a curbside mailbox to be positioned 41 to 45 inches above the road surface, measured to the bottom of the mailbox or the point where mail enters. The mailbox door should normally sit 6 to 8 inches back from the front of the curb. When there is no raised curb, USPS recommends asking the local postmaster for placement guidance because roadside conditions can vary.
Measure the height from the road surface, not from the grass beside the post. The ground may be several inches higher or lower than the road, which can produce an incorrect final height.
The mailbox should also be placed where the carrier can approach it, deliver the mail, and continue along the route safely without leaving the vehicle. Depending on the carrier’s direction of travel and local traffic rules, the Post Office may specify which side of the road must be used.
Postal rules are not the only requirements to consider. State highway departments, local road authorities, homeowners’ associations, and neighborhood design rules may have additional standards. In snowy areas, leave enough space for snow-removal equipment and consider a support design that is less likely to be damaged by a snowplow.
Gathering everything before you begin will make the project easier and reduce the chance of leaving a post unsupported while looking for missing hardware.
You will usually need:
Check the mailbox package before buying separate hardware. Some models include a mounting bracket, while others require a board or adapter that is sold separately. Read the instructions for both the mailbox and the post because hole dimensions and fastening methods can differ between products.
For a new or replacement curbside installation, select a mailbox marked with the Postmaster General’s approval. USPS-approved models meet standards for size, strength, construction, door operation, and protection from normal weather. A custom-built curbside mailbox should be shown to the local postmaster for approval before it is installed.
Choose a size that suits the amount of mail you normally receive. A standard box may be enough for letters and small envelopes, while a large-capacity design can hold catalogs, padded envelopes, and some packages. The door should close securely, the outgoing-mail flag should move freely, and rainwater should not easily enter the box.
For the mailbox post, pressure-treated wood is widely used because it is easy to cut, drill, and replace. Aluminum and standard steel posts can resist rot and may require less maintenance, although damaged finishes should be repaired to prevent corrosion.
Roadside safety matters when choosing the support. USPS states that the ideal post should remain stable during normal use but bend or fall away if struck by a vehicle. Federal Highway Administration guidance referenced by USPS recommends a wooden support no larger than 4 by 4 inches or a standard steel or aluminum pipe no larger than 2 inches in diameter. Heavy metal pipes, solid concrete posts, and other unyielding structures may create a roadside hazard.
Consider the local climate as well. Treated wood and corrosion-resistant fasteners are useful in wet areas, while an extended-arm support may be practical where snowplow damage is common.
Accurate measuring before digging can prevent most placement problems. Begin by identifying the front face of the curb. If there is no curb, use the road edge and follow the location approved by your local Post Office.
Measure 6 to 8 inches back from the curb or road edge to the position of the closed mailbox door. Remember that the post itself will usually be farther from the road because the mailbox projects forward from the support.
Next, calculate the post height. The bottom of the finished mailbox or the point of mail entry must generally be 41 to 45 inches above the road surface. Measure the mailbox, mounting board, and post arm together before marking the post. Do not assume that the top of the post will be level with the bottom of the mailbox.
Check the area around the planned location. The carrier needs a clear approach without parked vehicles, trash containers, shrubs, signs, or low branches. The mailbox door should open fully without hitting the post, landscaping, or another mailbox.
Also consider drainage. Avoid placing the post in a ditch, a low area that stays wet, or a spot where runoff could wash soil away from the foundation.
Contact 811 or your state’s utility-marking service before digging. This applies even to a small mailbox hole. The free 811 service arranges for participating utilities to mark the approximate location of underground lines so you can avoid damaging electricity, gas, water, or communication services. Requests should be made a few business days before work begins, according to the instructions for your state.
Once the area has been cleared for digging, make a narrow hole that fits the post and chosen foundation method. Avoid creating a much wider opening than necessary because a large disturbed area can be harder to compact firmly.
USPS safety guidance recommends burying an approved mailbox support no more than 24 inches deep. This limit helps the support remain more likely to bend or fall away if hit by a vehicle.
For a wooden post, add several inches of gravel at the bottom of the hole to improve drainage. Compact it so the post rests on a firm base. Test-fit the post before adding concrete or backfill, then temporarily place the mailbox or mounting arm on top. Measure from the road surface again to confirm that the finished box will be within the correct height range.
Concrete can provide a firm base in many soil conditions, but the post and foundation must still follow local roadside safety requirements.
Place the post in the center of the prepared hole. Set a level against one side and adjust the post until it is vertical. Move the level to an adjacent side and check it again. A post can appear straight from the front while leaning toward or away from the road.
Attach temporary braces to stakes in the ground so the post cannot shift. Recheck the mailbox height and curb setback before adding concrete.
Prepare the fast-setting concrete according to the manufacturer’s directions. Some products are poured into the hole dry before water is added, while others must be mixed in a container first. Follow the product instructions rather than guessing at the amount of water.
Fill around the post while keeping the top of the concrete slightly below ground level if you plan to cover it with soil. Shape the exposed surface so water runs away from the wood instead of collecting around it.
Check the post with the level again immediately. Leave the braces in place and allow the concrete to cure for the time listed on the package. Do not mount a heavy mailbox or pull on the post before the foundation has developed enough strength.
It is also possible to learn how to install a mailbox post without concrete. This method may work well in firm, well-draining soil and makes future post replacement easier.
Place the post on the prepared gravel base and hold it vertically. Add crushed stone or compactable gravel around it in shallow layers. Compact each layer firmly with a narrow piece of wood or tamping tool before adding the next one. Filling the entire hole at once can leave loose spaces that allow the post to move.
Check the post frequently with a level. Also confirm that the mounting arm still points in the correct direction and that the final mailbox height has not changed.
A gravel installation drains well and does not trap as much moisture against a wooden post. It can also be removed more easily than concrete. However, it depends heavily on careful compaction. Loose gravel, ordinary garden soil, and uncompacted backfill may not hold the post securely.
Wet clay, loose sand, frost movement, erosion, and repeated snowplow pressure can make a concrete-free post less stable. In those conditions, use a foundation method suitable for the soil and approved by the local road authority. An expanding post-setting product may be another option, but it should only be used when its instructions confirm that it is suitable for the post material and outdoor conditions.
Before mounting the box, inspect the wooden post. It should be straight, firm, pressure-treated for outdoor use, and free from deep cracks or serious rot.
Many mailboxes cannot be screwed directly to the narrow top of a post. They require a mounting board or bracket that supports the bottom of the box. Position the board so the mailbox will be centered and the door will extend toward the road at the approved setback.
Mark the screw holes and drill small pilot holes. Pilot holes make the screws easier to drive and reduce the chance of splitting the wood. Use galvanized, stainless-steel, or otherwise corrosion-resistant exterior fasteners.
Secure the mounting board first, then place the mailbox over it. Some boxes are attached through holes along the lower sides, while others connect to a metal bracket underneath. Use the fastening points specified by the manufacturer instead of drilling random holes through the mailbox.
Leave enough clearance for the front door and carrier flag to move without rubbing. Seal fresh cuts and exposed drilled areas with an outdoor wood preservative when recommended for the type of treated lumber you are using.
Installing a mailbox on an existing post can save time, but only when the old support remains safe and strong.
Push gently against the post from several directions. It should not rock in the soil or feel loose at the base. Examine wooden posts for softness, splitting, insect damage, and rot near ground level. Check metal posts for rust, bending, cracked welds, and loose connections.
Measure the existing support before buying a new mailbox. Confirm that the finished door can be placed 6 to 8 inches from the curb and that the mailbox will sit within the 41-to-45-inch height range.
Remove the old box carefully and keep any hardware that remains in good condition. A universal mounting bracket or a new wooden board can often connect a modern mailbox to an older post. Avoid making many new holes close together because this can weaken wood or create rust points in metal.
A trustworthy video can help you understand how a specific bracket fits, but it should only be visual support. The mailbox manufacturer’s instructions, USPS guidance, and local placement rules should take priority over a general online demonstration.
Set the mailbox on its mounting board or bracket and center it before inserting the fasteners. Begin every screw or bolt by hand. This helps prevent cross-threading and lets you make small adjustments before the hardware is tightened.
Place the level across the top and along the side of the box. The mailbox should not lean toward the road or slope so sharply that the door falls open.
Open and close the door several times. It should face the road, move freely, and latch without scraping. Raise and lower the outgoing-mail flag, and test the lock or mail slot if the mailbox has one.
Tighten the fasteners evenly. They should hold the box securely without crushing a plastic base, bending thin metal, or pulling the mailbox out of alignment. USPS guidance says the mailbox should be securely attached to its support so it does not easily separate if the installation is struck.
Add clear, weather-resistant address numbers that can be seen by the approaching carrier. Current USPS guidance states that address information should be displayed in a contrasting color with letters and numerals at least 1 inch high. If the mailbox is on a different street from the home, place the full street name and house number on the box.
Complete one final measurement from the road surface to the bottom of the mailbox or mail entry point. Recheck the distance from the curb to the closed door.
Look for exposed screw tips, sharp metal edges, loose washers, or gaps in the mounting bracket. Make sure the flag, hinges, latch, and door operate normally.
After the concrete or compacted foundation is fully secure, fill the remaining space with soil as appropriate and restore the grass around the post. Press gently against the support to check for movement, but do not apply heavy force to fresh concrete.
Keep the approach clear after installation. Vehicles, garbage containers, overgrown plants, and snow can prevent safe delivery even when the box itself is correctly positioned.
One of the most frequent mistakes is measuring from the lawn instead of the road. Always use the road surface as the starting point for the required height.
Another common problem is placing the post itself 6 to 8 inches from the curb. The setback is measured to the mailbox door, so the exact post location depends on how far the mailbox extends from its support.
Never dig before requesting utility markings. A mailbox hole may be small, but underground services can be closer to the surface than expected.
Do not attach the mailbox before fresh concrete has cured enough to support it. The added weight and drilling pressure can pull the post out of alignment.
Indoor screws are also a poor choice because they can rust quickly. Use exterior hardware that is compatible with the mailbox and post materials.
Avoid heavy, unyielding supports near the roadway. Decorative stone surrounds, large pipes, and concrete-filled objects may look strong, but they can create serious safety concerns if struck.
Finally, do not reuse an old post simply because it is already there. A post that leans, moves, or has hidden rot will make the new mailbox unstable.
Wall-mounted mailboxes are generally used where the carrier provides door delivery rather than curbside vehicle delivery. You must obtain permission from your local postmaster before replacing an existing curbside mailbox with a wall-mounted one. USPS recommends placing a wall mailbox near the main entrance where the carrier can easily see and reach it.
Hold the box against the wall and use a level to position it. Mark the mounting holes without letting the box move.
Choose screws, anchors, and drill bits made for the wall material. Wood, vinyl siding, brick, concrete, and stucco require different mounting methods. Avoid fastening a heavy box only to thin siding. Locate solid framing or use suitable masonry anchors when necessary.
Drill the holes, insert the anchors, and fasten the mailbox evenly. Seal openings where water could enter the exterior wall, but do not block drainage holes built into the mailbox.
Finish by testing the lid, lock, and mail opening. The box should be large enough for a normal day’s letters, postcards, and catalogs without leaving mail exposed.
Understanding how to install a mailbox begins with careful planning. The most important steps are confirming local placement requirements, measuring from the road surface, choosing a safe mailbox post, and mounting the box with compatible outdoor hardware.
Whether you install the mailbox post with concrete, use compacted gravel, attach a box to a wooden support, or reuse an existing post, check the height and roadside setback before making the installation permanent. Small measuring errors are much easier to correct before the hole is filled and the hardware is tightened.
A properly installed mailbox should remain straight, resist normal weather, open smoothly, and provide clear access for the mail carrier. By checking postal, road, utility, and property requirements before beginning, you can create a residential mailbox installation that is safe, practical, and built for dependable daily use.
A mailbox post is commonly placed about 18 to 24 inches into the ground. USPS safety guidance recommends avoiding a depth greater than 24 inches for a typical curbside mailbox support.
A curbside mailbox should generally be positioned 41 to 45 inches above the road surface. Measure to the bottom of the mailbox or the point where the mail enters.
The front door of a curbside mailbox should normally sit 6 to 8 inches back from the curb. Roads without raised curbs may require placement guidance from the local postmaster.
Yes. A mailbox post can be installed with firmly compacted gravel or crushed stone when the soil is stable. Loose, sandy, wet, or frost-prone ground may require a stronger foundation.
Yes, provided the existing post is straight, stable, correctly positioned, and free from serious rot, rust, or damage. A universal bracket or replacement mounting board may be needed.
Disclaimer: This article is provided for general informational and educational purposes. Mailbox placement rules, road regulations, utility requirements, neighborhood restrictions, and installation conditions may vary by location. Confirm current requirements with your local Post Office, road authority, homeowners’ association, and utility-marking service before digging or changing your mailbox location. Follow the instructions supplied by the mailbox, post, concrete, and mounting-hardware manufacturers.