 11
11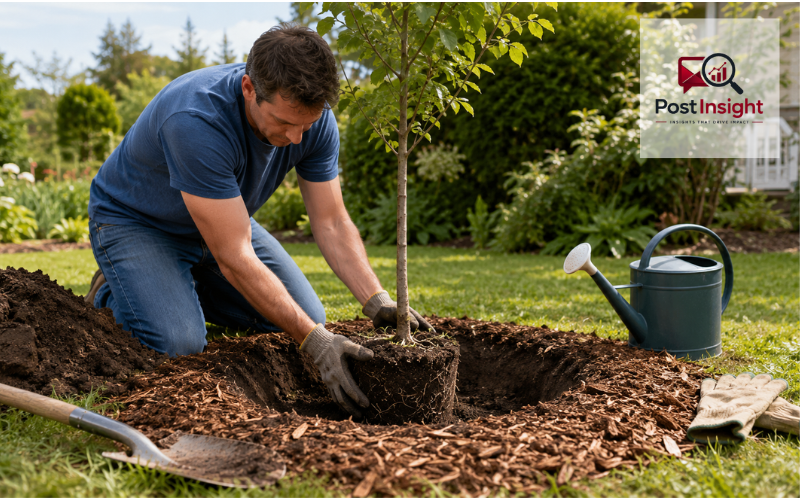
Learning how to plant a tree is simple, but a few decisions made on planting day can affect its health for years. The most important details are correct depth, outward-growing roots, steady watering, and proper mulch placement. When these basics are handled well, a young tree can establish a strong root system and grow with less stress.
This guide explains how to plant a nursery-grown tree directly in the ground. The process works for many shade, flowering, fruit, and ornamental trees, although individual species may have extra needs.
Planting too deeply is one of the most damaging beginner mistakes. The root flare—the wider area where the trunk meets the main roots—should remain visible at the soil surface. Current university extension guidance recommends a wide planting hole, no deeper than the root ball, with the root flare level with or slightly above the surrounding ground.
With basic tools and careful preparation, most homeowners can complete the job successfully.
| Step | What to Do | Important Tip |
| 1. Choose the location | Select a place with suitable sunlight, soil, and enough growing space. | Check the tree’s mature height and width. |
| 2. Find the root flare | Remove excess soil until the trunk widens into the main roots. | Never bury the root flare. |
| 3. Dig the hole | Make it two to three times wider than the root ball. | Keep the hole no deeper than the root ball. |
| 4. Prepare the roots | Remove the container and loosen or trim circling roots. | Lift the tree by the root ball, not the trunk. |
| 5. Position the tree | Place it straight with the root flare level with or slightly above the ground. | Check the tree from several angles. |
| 6. Backfill the hole | Refill the hole gradually with the original soil. | Do not heavily pack the soil. |
| 7. Water deeply | Soak the root ball and surrounding planting area. | Adjust watering according to rainfall and soil moisture. |
| 8. Apply mulch | Add a two-to-three-inch layer over the root zone. | Keep mulch several inches away from the trunk. |
Choose a tree that suits the local climate, soil, rainfall, and available sunlight. A sun-loving tree may struggle in deep shade, while a species that needs free-draining soil may decline in a wet, heavy site. Local nurseries and horticultural services can help identify trees that perform well in your area.
Plan for the tree’s mature size, not its size at the nursery. Check its expected height, canopy width, and growth habit. Leave enough room between the tree and buildings, fences, driveways, and other large plants. Keep tall-growing species away from overhead power lines, and contact your local utility-locating service before digging where underground lines may be present. Checking mature size before planting helps prevent crowding and expensive removal later.
Spring and early fall are often good planting periods because temperatures are milder. In cold regions, plant early enough in fall for roots to begin settling before the ground freezes. In hot, dry climates, avoid extreme summer heat unless you can provide reliable water and close care.
Prepare the tools before taking the tree out of its container or wrapping. You will usually need:
Do not automatically add fertilizer, potting mix, or large amounts of compost to the hole. In most landscape settings, the original soil removed during digging is suitable for backfilling.
The five main steps are:
The order matters. Measuring first prevents an overly deep hole, and inspecting the roots before backfilling gives you a chance to correct circling growth.
The root flare is where the lower trunk widens and the first major roots extend outward. A correctly planted tree should not look like a straight pole disappearing into the soil.
Nursery soil may cover the flare, so do not assume the top of the potting mix marks the correct depth. Gently remove soil from around the trunk until the first large structural roots are visible. Measure from that exposed flare to the bottom of the root ball.
Use this measurement to set the hole depth. The flare should finish level with the surrounding soil or slightly above it, especially in compacted or poorly drained ground. Keeping it visible reduces problems caused by buried bark and wrongly positioned roots.
Mark a circle two to three times wider than the root ball. A wide hole loosens the nearby soil and gives new roots an easier route into the surrounding ground. The sides can slope gently outward toward the surface.
Keep the center no deeper than your root-ball measurement. Leave the soil beneath the ball firm because loose soil may settle after watering and pull the tree below grade. If the hole is too deep, replace the extra depth with firmly packed native soil and measure again.
In heavy clay or soil polished smooth by an auger, roughen the sides with a shovel. This removes the container-like surface and helps roots move outward. Current extension guidance supports a hole two to three times wider than the root ball without unnecessary depth.
Lay a container-grown tree gently on its side, tap the pot, and slide the root ball out. Never pull or carry the tree by its trunk. Support the root ball to avoid damaging the connection between the trunk and roots.
Inspect the outside of the ball. If the roots circle the pot, kink sharply, or form a tight outer mat, loosen them by hand. For a badly pot-bound tree, make several shallow vertical cuts and loosen or trim thick circling roots with a clean tool. Correcting these roots can reduce the risk of girdling growth later.
For a balled-and-burlapped tree, place the intact ball in the hole first. Once it is stable, remove twine from around the trunk, pull burlap away from the top and sides, and remove the accessible upper part of the wire basket without breaking the root ball. Synthetic wrapping should not remain in the soil.
Move the tree by supporting the root ball. Set it in the center and lay a shovel handle or straight board across the hole to check the depth. The root flare should meet the surrounding grade or sit slightly above it.
Step back and view the tree from two directions. Adjust it until the trunk looks straight. Make these changes before adding much soil.
Backfill with the original soil. Break large clods and work the soil carefully around the roots. When the hole is about half full, water to settle loose soil. Finish backfilling, then press gently with your hands or the back of the shovel. Do not stamp the soil into a hard layer.
A rich pocket of compost or potting soil is usually unnecessary. Using native soil encourages roots to move beyond the original planting hole.
After the hole is partly filled, apply water slowly around the root ball. This settles soil into open spaces and improves root-to-soil contact. Complete the backfill and water the whole planting area deeply once more.
Use a gentle hose flow, watering bag, or several buckets applied in stages. The amount depends on the tree’s size, soil, temperature, wind, and recent rainfall. The goal is to moisten the entire root ball and nearby soil without leaving them permanently soaked.
If water runs away from the site, use spare soil to form a low, temporary basin near the outer edge of the hole. Keep the basin away from the trunk, and flatten it when it is no longer useful.
Apply a two-to-three-inch layer of wood chips or shredded bark over the planting area. Extend it at least as wide as the hole and farther when space allows. Mulch slows moisture loss, reduces weed competition, moderates soil temperature, and helps protect the trunk from lawn equipment.
Shape the mulch like a broad, flat donut. Leave several inches of clear space around the trunk and keep the root flare visible. Mulch piled against bark can trap moisture, hide damage, encourage unwanted roots, and increase the risk of decay.
Check the mulch each year. Break up compacted material and add only enough to maintain the proper depth rather than creating a growing mound.
A newly planted tree needs steady moisture while roots begin growing beyond the original ball. As a starting schedule, water daily during the first one to two weeks when there is no soaking rain. Then water every two or three days for several weeks. Later, water deeply about once a week during dry periods. Adjust this routine for the tree’s size, rainfall, temperature, wind, and soil drainage. University of Minnesota guidance recommends frequent early watering followed by a gradual reduction as establishment continues.
Check the soil instead of following the calendar blindly. Push a finger or small trowel a few inches into the root zone. Water when it feels dry at that depth. Wait if it is still wet and sticky. Sandy soil may dry quickly, while heavy clay can stay wet much longer.
Most properly planted young trees do not require staking. Stake only if the root ball moves, the tree is top-heavy, or the site is very windy. Use broad, flexible ties placed low enough to allow slight trunk movement. Remove the supports after one growing season, or sooner once the tree is stable, so they do not rub or restrict the trunk.
At planting time, remove only dead, broken, or badly damaged branches unless a qualified arborist recommends additional pruning.
The most serious mistake is covering the root flare with soil. A deeply planted tree may look stable at first, but buried trunk tissue and poorly placed roots can cause problems later.
Other common errors include digging a narrow hole, loosening the bottom until the tree sinks, leaving thick circling roots untreated, and filling the hole only with rich compost or potting mix. Avoid adding fertilizer unless a soil test or local professional shows that it is needed.
Do not stamp the backfill hard, pile mulch against the trunk, or tie the tree tightly to stakes. Also remember that more water is not always better. The root zone should remain evenly moist during establishment, not dry and dusty or constantly waterlogged.
Growing a tree from seed is different from planting a young nursery tree. A seed must germinate, survive its delicate seedling stage, and grow for several years before it begins to look like a landscape tree.
Start by identifying the species because tree seeds have different needs. Some can be planted soon after collection, while others remain dormant until they experience cold, moisture, warmth, scarification, or another natural trigger. Cold stratification means keeping seeds in cool, moist conditions for a species-specific period to help break dormancy.
Use mature, viable seed and follow instructions for that exact tree. Sow it in a clean, well-drained medium at the recommended depth. Keep it evenly moist without soaking it. Once seedlings emerge, provide suitable light and protect them from harsh weather, diseases, pets, and rodents.
Move a seedling outdoors gradually so it can adjust to stronger light and wind. Plant it in the ground once it has sturdy growth, a healthy root system, and suitable weather. Trees grown from seed may not match the parent tree, especially named fruit and ornamental varieties. Germination may also be slow or uneven, so expect some seeds not to survive.
For beginners, divide the work into small jobs: choose the site, find the root flare, measure, dig, inspect the roots, position, backfill, water, and mulch. Check the depth and trunk position before moving to the next stage.
Children can help measure the root ball, crumble loose soil, add light backfill, water with a small can, and spread mulch away from the trunk. Adults should handle heavy lifting, knives, pruners, wire cutters, deep digging, and work near utilities.
YouTube videos and Reddit discussions may offer useful visual ideas, but not every method suits every climate, soil, or tree. Compare online advice with guidance from a local extension service, botanical garden, qualified arborist, or trusted nursery.
Before finishing, check that:
Knowing how to plant a tree correctly comes down to a few dependable principles. Keep the root flare visible, give roots a wide area in which to expand, correct circling roots before backfilling, and avoid packing the native soil too firmly. Water deeply enough to moisten the root ball, then protect the soil with a flat mulch ring that does not touch the trunk.
Careful planting cannot prevent every future pest, storm, or drought, but it removes many avoidable sources of stress. During the first growing season, continue checking soil moisture, trunk stability, mulch depth, and drainage. Regular observation can help a newly planted tree establish well and grow into a healthy part of the landscape for decades.
The hole should be no deeper than the distance between the bottom of the root ball and the exposed root flare. Planting too deeply can damage the trunk and roots.
Spring and early fall are usually suitable because temperatures are mild and soil moisture is easier to maintain. The ideal season can vary depending on the local climate and tree species.
In most cases, use the original soil removed from the hole. Too much compost or fertilizer can discourage roots from spreading into the surrounding ground and may damage young roots.
Water frequently during the first one to two weeks, then gradually reduce the schedule. Always check the soil and adjust for rainfall, heat, drainage, and the size of the tree.
No. Stake a tree only when it is unstable, top-heavy, or exposed to strong winds. Use flexible ties and remove the supports once the tree can stand securely.
Disclaimer: This article provides general tree-planting information. Requirements may vary by tree species, climate, and soil conditions, so consult a local horticultural expert when necessary